

Just a few weeks before Christmas someone (you know who you are SR) dropped a heavy hint for a gift. The request for a tree skirt set my brain cogs whirring – a most welcome sewing project, the most perfect distraction from Christmas prep lists!
I started with a quick internet search which took me to a very old Missouri Star video tutorial. I used Jenny’s demo as my starting point, adapting the materials and measurements to suit my Christmas fabric scrap stash and the more modest sized trees generally found in our standard height rooms.

The resulting Octagonal Tree Skirt measures 37″ x 37″ (94cm x 94cm). I thought it might be helpful for me to record and share how I made this addition to the festive decor. I’ve written a brief pattern and below you’ll find a tutorial with a few extra hints and tips. The pattern is free to download and includes instructions and layout diagrams.
Let’s get down to the tutorial 😀
Materials (assuming Width Of Fabric is 42″):
- Thirty -seven (37) 4½” squares (I made some Four-Patch squares using 2½” squares when I ran out of larger scraps)
- Two (2) 7″ squares – cut each across the diagonals to create eight (8) setting triangles
- Inner border: Four (4) 1¾” Width Of Fabric (WOF) strips
- Middle Border: Four (4) 3″ WOF strips
- Outer Border: Four (4) 1¾” WOF strips
- Backing: 39″ x 39″ (1m x 1m)
- Wadding: 39″ x 39″ (1m x 1m)
- Binding: 50″ (130cm) double fold *bias binding (I made this using some of the excess triangles of Backing Fabric from STEP 8)
- Fastening: ¾yd (75cm) of coordinating ribbon or tape cut into two equal pieces
*Bias binding: This was my first attempt at making and attaching bias binding to a quilted project. I kinda winged-it so I haven’t included instructions for making bias binding. If like me you are new to this type of binding don’t be put off making the Tree Skirt. There are lots of helpful tutorials on the web or it would be perfectly OK to use ready-made bias tape to seal the raw edges.
Method (use ¼” seams throughout)
- STEP 1. Stitch together the 37 squares and 8 setting triangles to create the octagonal patchwork centre.

- STEP 2. Add the inner border by stitching the 1¾” strips to the sides with three squares. Cut the excess fabric from each strip, making sure there is a short ½” (1cm) overhang. Press seams away from the centre.

- STEP 3. Trim the strips level by placing a ruler in line with the setting triangle edges.

- STEP 4. Use the excess Inner Border strips from STEP 2 to add strips to the Setting Triangle edges of the octagon. Make sure there is a short ½” (1cm) overhang. Press seams away from the centre.

- STEP 5. Trim the excess fabric in line with the adjoining Inner Border strips.

- STEP 6. Add Middle and Outer Borders following the same sequence as used for the Inner Border.

First strips of the Middle Border stitched in place and trimmed to size.
- STEP 7. Press the completed Tree Skirt top and then on a flat surface layer up the quilt sandwich as follows: first Wadding secured in place with masking tape; second Backing Fabric, right side facing up, directly on top of the wadding; finally smooth and pin the Skirt top, right side facing down, on top of the Backing.
- STEP 8.Stitch together all three layers ¼” inside the outer edge of the Skirt top. Leave an opening approx. 4″ (10cm). Cut away excess Backing and Wadding from around the sandwich.
- STEP 9. Remove pins and turn the quilt sandwich right sides out. Carefully push out the corners before stitching closed the opening.
- STEP 10. Smooth out the Tree Skirt from the centre. Pin the layers together. Quilt as desired. (I chose to quilt a spiral from the middle of the Skirt to the Outer Border. I also added a row of top stitching a ¼” in from the outer edge of the Skirt).
- STEP 11. Create the opening and centre hole of the Skirt: Use a ruler and marking tool to draw a straight line from the centre of the Tree Skirt to the middle of one edge. Use a circular template approx. 4″-5″ (10cm-13cm) in diameter to mark the centre ‘hole’. Cut along the marked lines.

- STEP 12. With right side facing, pin the ribbon/tape ties on opposite sides of the opening about 2″ (5cm) down from the centre circle. Then stitch the raw edge of the bias binding to the raw edge of the opening.

- STEP13. Hand stitch the binding to the wrong side of the Tree Skirt.
Your project is complete!
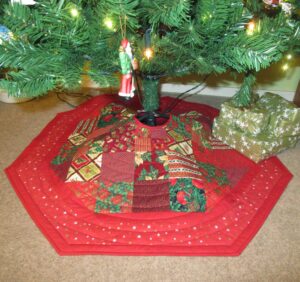
Don’t forget the instructions for this Octagonal Tree Skirt are ready as a free download. Any questions? Just contact me via the comments box at the end of this page or via email info@patchwork-quilting.co.uk
Allison

What a great project, Allison! And a great head start on next year’s Christmas!
Happy New Year! 🙂
Thanks Laura! Happy New Year to you too.